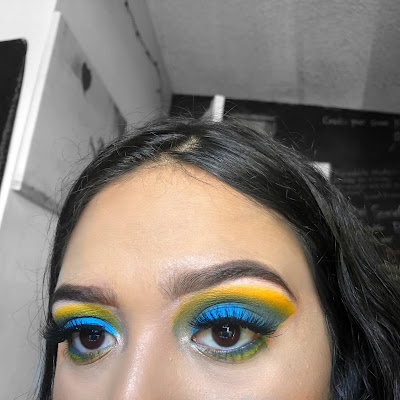
Peacock Inspired Eyeshadow
Happy hump day! For today's post I will be talking a little bit about this look I created the other day. I am absolutely in love with it! I wasn't too sure what I was doing. All I knew is that I wanted to create something colorful. I started looking up one hashtag on Instagram and there I saw a peacock. BAM! inspired. Patience is key people! Without further a do, lets get right into this post!
Brows
I always always always start with my eyebrows first. I've adjusted my routine to what it is now but have seemed to have found doing my eyebrows first suits me. I start with the Anastasia Beverly Hills Brow Wiz in the shade dark brown. I brush my brows up, create an outline under my eyebrow following my natural shape. However, I like to keep the front of my brow bare for a more ombre look. Then, I brush my eyebrow hair downward and create the arch. I then brush my hairs back up and fill in any sparce areas still leaving the front bare. I then darken the bottom of my brow again but this time with the Kat Von D eyebrow pomade in Walnut. After, I go back in with my Brow Wiz and create light feather like strokes toward the front of my brow.
 |
| Kat Von D 24 Hr Super Brow Longwear Pomade $19 |
 |
| Anastasia Beverly Hills Brow Wiz $18 |
Eyes
For my favorite part of doing my makeup, EYES! Eyes are the window to the soul guys! A blank eye is a blank canvas to endless creativity! For the first product I used, I picked up a bright yellow shade from MAC called Chrome Yellow and applied it to my crease with a fluffy blending brush.
 |
| Chrome Yellow MAC - $17 |
 |
| Morphe 35B palette discontinued :( |
that color and blend.
The next product I used came from the Anastasia Beverly Hills Subculture Palette. I used a sigma detail crease brush and packed the shade Axis into my crease and the outer corner of my eye.
 |
| ABH Subculture Palette $42 |
 |
| Nars Soft Matte Complete Concealer $30 |
For Lashes I used the Ardell Mega Volume Lashes and I lost the box so I'm not too sure of the number. Sorry guys! But any pair of full wispy lashes will do! After Applying my lashes I just smoked out the undereye with the shade Axis and right below that, I smoked out the shade Chrome Yellow with a clean detail brush.
For finishing touches, I applied the Becca Shimmering Skin Perfector Pressed Highlight in the shade Opal onto the inner corner of my eye with my pinky.
 |
| Becca Shimmering Skin Perfector Pressed Highlight in Opal $19 |
There you have it! The complete guide to this look! If you guys want me to film a video on this please let me know and I will or if you have any more questions feel free to message me! Until then, catch your next Daily Cup of Lisa next time! Thank you so much for reading!!


I love this look! Keep going!
ReplyDeletethank you so much! it means the world!
Delete